
Electronic Personnel Action Form
Introduction
An EPAF is an Electronic Personnel Action Form. This is an online form that will replace paper forms. This form is originated by a department to submit employment data changes. EPAFs replace paper forms in processes such as hiring a student employee, updating job labor distribution and more.
For training on using the EPAF, please visit this link.
Once you have completed the training and need access to the EPAF system please contact Patty Barber.
EPAF User Types
There are three different types of EPAF users:
- Originators - users who begin an EPAF action
- Approvers - users who must approve an EPAF action
- Proxies - users who are designated by an Approver with specific authority to approve actions on the Approver’s behalf
Accessing EPAF
To access EPAF:
- Log into BannerWeb:
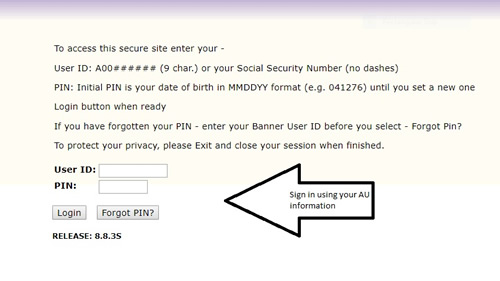
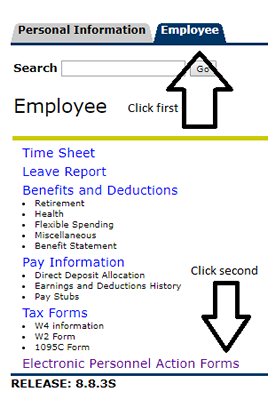
- Choose the employee tab.
- From the Employee tab, select Electronic Personnel Action Form.
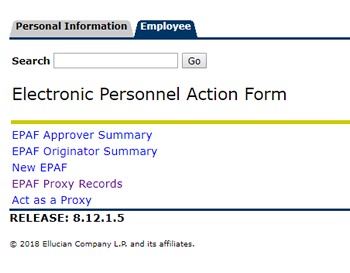
EPAF Menu
Based on your role, you will be granted access to one or more of the following EPAF links:
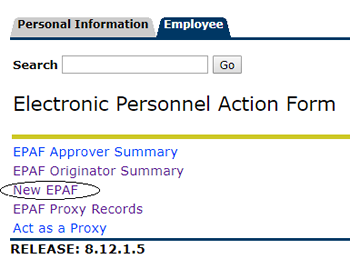
How to Originate a New EPAF (for a student hire)
On the EPAF menu, select "New EPAF":
Employee Selection
Enter the employee’s AU ID into the ID field. If you do not know their ID number, you can search for it by clicking on the magnifying glass icon.
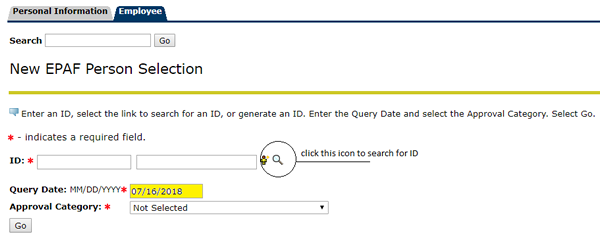
Query Date
The query date is the start date of this job (for example: the first day of work must be used for a student hire date.). This date field will default to today’s date and YOU MUST update it to reflect the actual start date of the position.
Approval CategorySelect the Approval Category that is appropriate for the transaction you are initiating. Click “Go.”
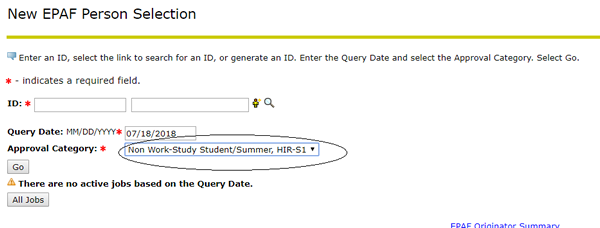
New EPAF Job Selection
This screen will show you a list of all active positions the employee has at AU. If you click “All Jobs” this will show you a list of all the jobs the employee has held at AU. It will also indicate whether they are still active or not. If they have an active job in the system and you need to input another job, you will need to select “Go” again.
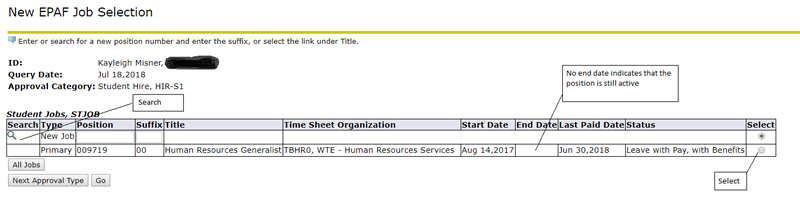
It is very important to look at all the jobs the employee has held before. If the employee has held this job before, you will need to reopen the job. You should write down their start date of that position as you will need it on future screens. If you are re-hiring the employee for a position listed on this screen, select the position number and click “Go.”
If this is a new position for the employee, as indicated by the position number not being listed, input the position number and suffix (00) into the Position and Suffix fields. Click “Go.”
If the student already has a job in this same department, the suffix should be (01, 02, etc…).
Position Numbers:If you are hiring for a summer job, in the position number section you should put an S, then your Organization number for the position number. Once you have tabbed over, the title should say SUM-Title.
If you are hiring for a Non-Work Study job, in the position number section you should put a 3, then your Organization number for the position number. Once you have tabbed over, the title should say NW-Title.
Completing the EPAF
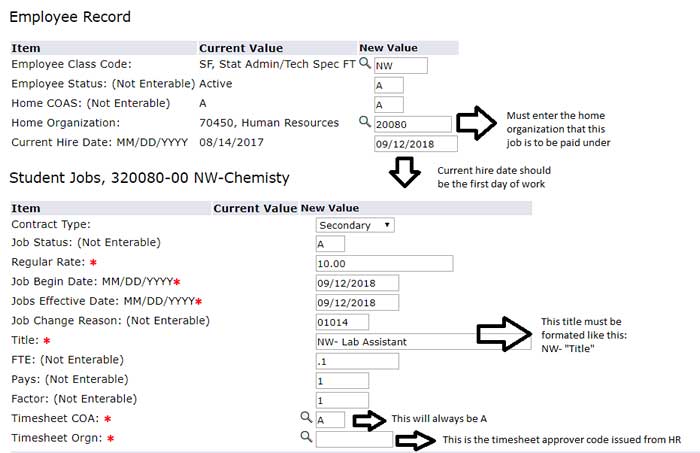
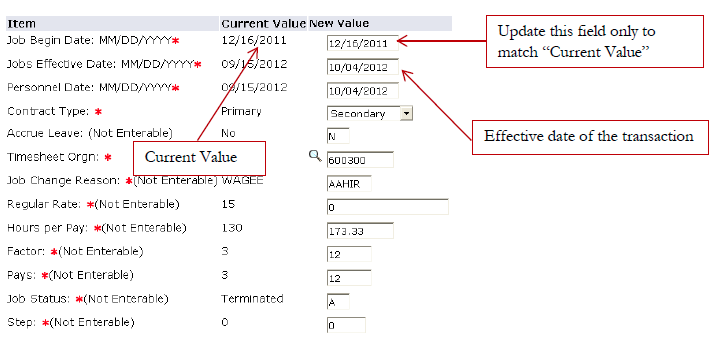
The next screen will allow you a final opportunity to change the effective date if needed. It will also ask you to determine whether the contract type is “Primary” or “Secondary.” The position will only be Primary if the employee has no other active positions on campus. Note that many of the data fields are not enterable.
When creating a title for the job, you should preface the title with NW- Title Here. If you are hiring a lab assistant, the title should look like “NW- Lab Assistant”. This will help the student find the correct job in the system when inputting their hours to Bannerweb.
The Timesheet COA and Timesheet Orgn both need to be filled out. The Timesheet COA will always be A. The Timesheet Orgn will be the timesheet approver code that is issued by HR for the Supervisor of the position who will be approving the timesheets. If you are unsure of your timesheet approver code, please contact Human Resources. Please DO NOT use the search icon for this field as the codes that it brings up are incorrect.
If the employee has already held the position before, there will be a “current value” listed. You must change the “New Value” to match the current value. For example:
The current value column may not show on your EPAF, however, you will still need the job begin date to be able to submit the EPAF.
Default Labor Distribution
The FOAP should populate into the EPAF for you. You should always check to ensure it is correct.
The EPAF system now allows you to override the default labor distribution. The position will automatically pull in the department’s default index code, or in the case of rehiring on the same position number, the last index code used on their job record. To override the index code, click on the index code listed and overwrite it with the correct index. If you need to add multiple index codes, click “Save and Add New Rows.” Once you have added all additional index codes, click “Default from Index.”
Take note of the “Account” code before you “Default from Index.” You will need to re-enter it.
Be sure the sum of labor distribution percentages equal 100%
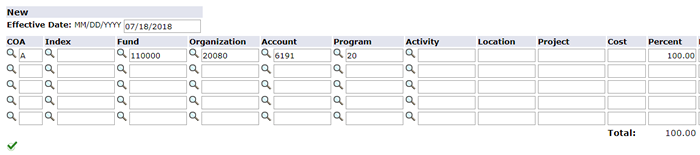
You will need to enter in a termination date for each student that you hire. Please be advised of the dates that you are selecting.

2023-2024 Important Dates to Remember:
Work Study:
Work-Study Dates Fall - 8/28/2023-12/15/2023
Work-Study Dates Spring - 1/16/2024-5/6/2024
Non-Work Study:
Non-Work Study Dates - 8/28/2023-5/11/2024
Summer 2023:
Summer Work Dates - 5/12/2024-8/25/2024
Routing Queue
This step will determine who will approve the EPAF transaction. Each EPAF has a pre-established set of approval levels assigned to the action. The Originator must select the appropriate individuals for each level.
Routing QueueThis step will determine who will approve the EPAF transaction. Each EPAF has a pre-established set of approval levels assigned to the action. The Originator must select the appropriate individuals for each level.

All approval levels automatically listed on the EPAF must have a User Name field populated. Click on the magnifying glass to select from the list of names associated with each level. It may be relevant to add the Research Accounting field to your EPAF, if your job needs to be approved through the Office of Sponsored Research. Other than that, do not add any other approval levels.
It should be noted that the person completing the EPAF does not have to be the Supervisor. The person completing the EPAF can select the Supervisor from the options. You should select Patty Barber (BARBERP) for 60- Position Control, Kayleigh Jones (MISNER) for 70- Human Resources, and Patty Barber (BARBERP) for 99- Enter Student into Payroll.
To route an EPAF for online approvals, click “Save” and then “Submit.” Once you have submitted your transaction without errors you will receive the following message: “The EPAF is now pending approvals.”
EPAF Originator Summary
The EPAF Originator Summary displays only those transactions that you have originated that are still waiting to be approved or applied. This page contains two tabs: Current and History.
Current Tab
The current tab shows two types of EPAFs: Waiting and Return for Correction.
- Waiting - If an EPAF has been created and saved but not submitted, it remains in the Waiting status. You can submit the EPAF later by clicking on the EPAF and submitting.
- Returned for Correction - If an EPAF contains an error or incorrect data, the Approver can return it for correction. To view a returned EPAF, click on the employee’s name. The Originator will be given three options: Delete, Void or Update.
Click on “Delete” to delete the EPAF before it is submitted.
Click on “Void” if you would like to delete the EPAF after it has been submitted.
Click on “Update” to make changes to the EPAF.
NOTE: only the Originator can make changes to the EPAF. If changes are made, the Originator must send and submit the EPAF for re-approval at all levels.
History TabAll EPAFs created by the Originator are stored in the History tab. To check on the status of an EPAF, click on the History tab and view the status under “Transaction Status.”
Transaction Statuses
- Pending - EPAF is pending approval
- Complete - EPAF has been completed and applied to the employee’s record
- Returned - EPAF has been returned for correction
- Voided - EPAF was voided
- Overridden - EPAF was overridden and approved at the HR level
- Removed from Queue - EPAF has been returned to the Originator, thus is removed from the Approval Queue
EPAF Approver Summary
The EPAF Approver Summary page is visible to all users designated as an EPAF Approver. This page contains three tabs: Current, In My Queue and History. This screen shows all actions that the Approver needs to take.
Current TabThe Current tab is your EPAF inbox. This is where EPAFs appear that need your approval and where you receive EPAF FYIs.
In My QueueThe In My Queue tab shows EPAFs that are still routing through the queues of your selected Approvers. These EPAFs are either submitted but not yet at the Approver level or have been approved by the Approver but are waiting other approvals or for HR to apply.
HistoryThe History tab shows EPAFs that have been approved by the Approver.
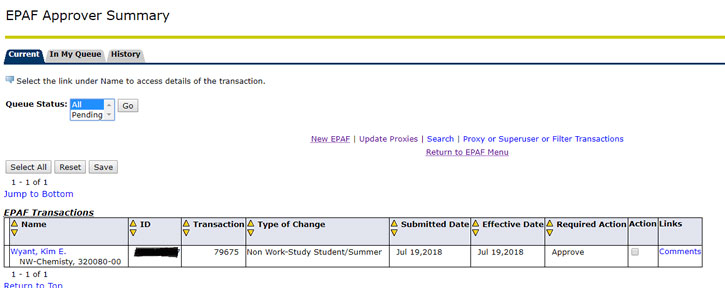
Approving an EPAF
Once an EPAF has been successfully submitted, the Dept. Admin listed in the routing queue must then go in and approve the EPAF. This needs to be done even if the initiator is also the Dept. Admin.
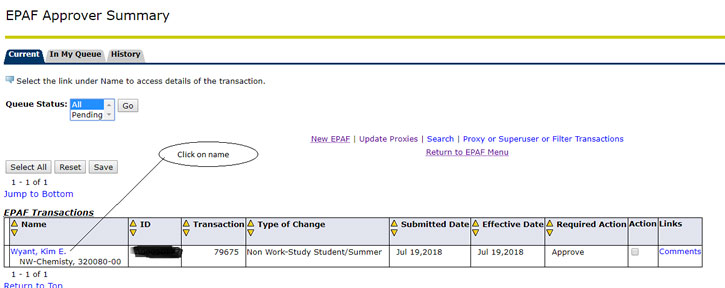
If you want to approve an individual EPAF, click on the employee’s name.

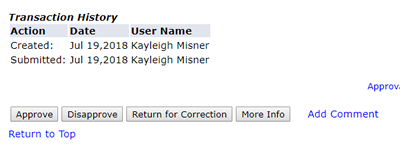
Always go into the actual EPAF and review for accuracy. At the bottom you can either choose to “Approve,” “Disapprove” or “Return for Correction.”
Errors and Warnings
Once you submit the EPAF, if there are any issues, the screen will show one of two message types:
- Warning - Warnings simply deliver information to the user but will still allow the EPAF to process successfully.
- Error - Error messages will not allow the EPAF to progress to the approval levels. Errors must be corrected.
These errors indicate that the employee needs to come to HR to complete or update their new employee mandatory paperwork.
- *ERROR* ID is not defined as an employee. Establish Employee Record.
- First Name, SSN/SIN, Birth Date or Gender incomplete
- *ERROR* Job Begin Date cannot be after Employee’s Termination Date
- *ERROR* New Effective Date cannot be after Employee’s Termination Date
This error means that the employee already has a job in Banner with this position number:
- *ERROR* Begin Date must equal the first Jobs Effective Date
This error means that the action being initiated has an effective date prior to the last paid date on this job record. Review and correct the entered effective date as needed. If this action is retroactive, HR will need to delete the EPAF and enter the action manually.
- *ERROR* New effective date must be greater than last date of xxxxxx
Please report any issues to human resources so they can be corrected immediately.